Hi! I just wanted to let everyone know that you can continue to read this blog at joylovecreate.blogspot.com
I also am excited to announce that I'm going to try to feature a guest blogger every first Friday of the month. Also, if there are any projects you'd like to showcase let me know! Thanks! Hope to see you there!

Thursday, September 1, 2011
Tuesday, August 23, 2011
Ice Cream Party
Since we went back to California to visit, I decided to throw a little ice cream party for Elijah and a few of his friends. I thought it would be a fun way to get together for a nice hot summer play date. I also think I just wanted any excuse to be able to throw a little party and I had so much fun decorating and finding fun things for it. I didn't get to decorate everything that I wanted to but I got the food done, so that was really what counts!
I only used two flavors of ice cream: chocolate and vanilla but added some fun garnishes.

I also made some fruit sauces to go with the ice cream. I got the idea from BHG and used some of their recipes too. They featured a lovely spread for a pie-a-la-mode ice cream social. Additionally, I added pie crust cookies and just rolled them in cinnamon and sugar to go with the fruit sauces.
The Gummy Bears and Sprinkles were a big hit with all of the kids.

You can get the peach recipe here and the chocolate-cherry recipe here.


Not that we needed any more sweets, but I've been wanting to make these all summer, so I also made rootbeer float cupcake ice cream cones. For the step by step how to and free printables go here and for cupcake recipes go here and here. (I really wasn't a big fan of the rootbeer buttercream recipe, so I'll use a different recipe next time)


It was so much fun getting Elijah's friends together and just watching them have so much fun and to just enjoy the day (and of course some yummy ice cream). I also wanted to add a special thank you to my friend, Ashley of Yve Louden Photography for taking pictures of the party!
I only used two flavors of ice cream: chocolate and vanilla but added some fun garnishes.

I also made some fruit sauces to go with the ice cream. I got the idea from BHG and used some of their recipes too. They featured a lovely spread for a pie-a-la-mode ice cream social. Additionally, I added pie crust cookies and just rolled them in cinnamon and sugar to go with the fruit sauces.
The Gummy Bears and Sprinkles were a big hit with all of the kids.


Not that we needed any more sweets, but I've been wanting to make these all summer, so I also made rootbeer float cupcake ice cream cones. For the step by step how to and free printables go here and for cupcake recipes go here and here. (I really wasn't a big fan of the rootbeer buttercream recipe, so I'll use a different recipe next time)

It was also a water party so I had the backyard sprinklers going and bought spray bottles and bubbles for the kids to play with and to send home as party favors. They had a blast with them!

It was so much fun getting Elijah's friends together and just watching them have so much fun and to just enjoy the day (and of course some yummy ice cream). I also wanted to add a special thank you to my friend, Ashley of Yve Louden Photography for taking pictures of the party!
Sunday, August 14, 2011
A Flower Dress
I'm really excited about this dress that I just made for Chloe. I've been wanting to make this dress for a few months now and finally got around to do it. I first got the idea for this dress when I went wedding gown shopping with a friend. I saw a gorgeous dress and fell in love with it. It's not one I would wear but loved the idea of it, so of course had to make a dress inspired by it for Chloe.
 I'm still working on it though. Appliqueing all of the flowers is taking some time and I wanted it for Chloe to wear on Sunday. Even as it is I think its great. It's also really easy to make. I made the dress and appliqued the front of the dress all in one night. (By the way, the dress is yellow and pink... the pink looks a little red in the photo)

For the top of the dress I just used one of Chloe's dresses to make a pattern and find dimensions. (Make sure to leave enough around to make a seam with!) To make the bottom of the dress I started by making a quick and simple skirt without making a casing for the elastic to go through. Instead of where the casing would be on top, I used the longest stitch on my sewing machine and pulled the thread so it would gather. I then sewed the skirt onto the top of the dress. (One day I might try to do an actual tutorial with step by step pictures but if you can't tell I'm not that great at explaining things) For the flowers I just made them out of chiffon and used the same technique that I used on her other dresses. One thing I have to do is install a zipper in the back. The dress is a little tight on Chloe (I used an old dress for her pattern and didn't realize she grew out of it...oops!) I haven't used a zipper before so that will be the new thing to learn how to do on this dress for me. But I found this tutorial on how to install a zipper, so hopefully it will work. :)

 But I love this dress and I think its so fun and flirty and is a great summer dress.

For the top of the dress I just used one of Chloe's dresses to make a pattern and find dimensions. (Make sure to leave enough around to make a seam with!) To make the bottom of the dress I started by making a quick and simple skirt without making a casing for the elastic to go through. Instead of where the casing would be on top, I used the longest stitch on my sewing machine and pulled the thread so it would gather. I then sewed the skirt onto the top of the dress. (One day I might try to do an actual tutorial with step by step pictures but if you can't tell I'm not that great at explaining things) For the flowers I just made them out of chiffon and used the same technique that I used on her other dresses. One thing I have to do is install a zipper in the back. The dress is a little tight on Chloe (I used an old dress for her pattern and didn't realize she grew out of it...oops!) I haven't used a zipper before so that will be the new thing to learn how to do on this dress for me. But I found this tutorial on how to install a zipper, so hopefully it will work. :)


Saturday, August 13, 2011
Back To School Printables
This is a very big year for us! Elijah is starting preschool this year. I can't believe he's already old enough to start going to school. His class doesn't start until next month so I have some time to emotionally prepare for it still, but since most kids start school this month, I thought I would post this now. I've been finding things online for back to school (can you tell that I'm excited for him? lol) and I thought these were cute ideas.
I know that I'll be taking lots of pictures of Elijah on his first day of school and I thought this was a cute idea from How Does She. Here are some printables to categorize each year's first day of school.

If you really want to go all out you can make this adorable chalk board cut out.

I also love the idea of sending notes with the kids to school and here are some cute cards and jokes you can use too.

And I'm sure every kid wants to bring his/her teacher a little gift at some point, so here's a card and printable you can use.

Along with a few sites for more teacher love:
http://thirtyhandmadedays.com/category/back-to-school/page/2/
http://www.lilluna.com/2011/08/holiday-101-thursday-back-to-school.html
http://anythingbutperfect.com/freebies/TeacherAppFlagsABP.pdf
Saturday, August 6, 2011
Drive In Movies at Home

I've been wanting to do this since before I was married and have held onto the project for a good five years now. So little to say, I was really excited to do this with the kids. Elijah was just as excited and he had a blast doing this too. He picked out all of the colors and even wanted to add the "number E on it for Elijah". He helped design Chloe's too. I just used stuff I had around the house (good thing we just moved so I have a TON of boxes) and we had a great time with it. I would probably paint the box next time (I just couldn't get to my paints) because the paper rips too easily with a toddler around. Obviously, if your kids are older/bigger you can do this with bigger/ longer boxes. You can even use one long box to fit in all the kids and not different boxes. This is such a fun and easy project and one that the kids will have so much fun with for hours and hours!

side not to self: mirrors face toward the driver not out :P
And what's a movie without a little popcorn?

Thursday, August 4, 2011
A Ruffled Cake
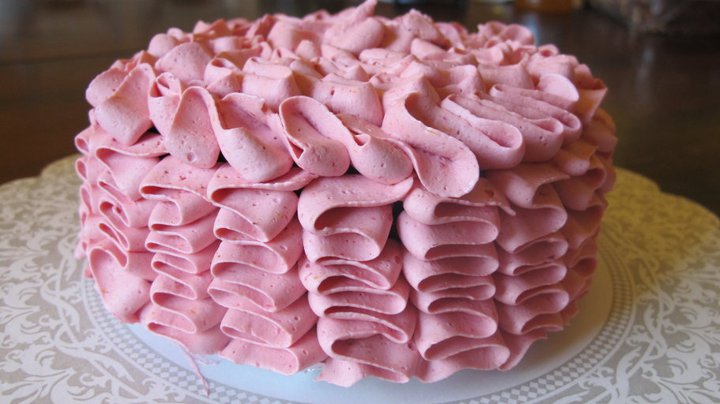
I also did the same for cupcakes (the picture's not that great, sorry)

Wednesday, August 3, 2011
The Best Brownies
It all started with the raspberries. A few days after moving, we found this little farm off the side of the road with the most beautiful and gigantic raspberries. We found it by accident and so we have no idea where to find it again. :( As soon as we tasted the ripe, plump, sweet and juicy raspberries, I immediately thought of this brownie recipe that I had seen on Desserts for Breakfast's blog. I've been wanting to make them for awhile but hadn't had the opportunity. This just seemed like the perfect welcome after our move.
I actually made these brownies a month ago and I still think about them. This is by far the best homemade brownie recipe that I have tried. They are just so gooey and rich and so satisfying. It was hard not to eat the entire pan by myself (I mean it would've be rude not to share or at least it'd make me look like a pig since it's a 9x13" pan). And the best thing about this brownie is that its dark chocolate. When you're craving something super chocolaty and something so delicious that will keep you content for hours after you eat it, this is what you need to make!

I actually made these brownies a month ago and I still think about them. This is by far the best homemade brownie recipe that I have tried. They are just so gooey and rich and so satisfying. It was hard not to eat the entire pan by myself (I mean it would've be rude not to share or at least it'd make me look like a pig since it's a 9x13" pan). And the best thing about this brownie is that its dark chocolate. When you're craving something super chocolaty and something so delicious that will keep you content for hours after you eat it, this is what you need to make!

YUM!
Thursday, June 30, 2011
Capes for Your Super Kids
I have two of the best kids ever! I know that every mom feels the same way about their own kids, and that's great too. But I just love my kids. They are always keeping me entertained and they both try so hard to help out, especially Elijah. He's always been my little "big" helper. He even helps to chase his little sister around and tries to mind her for me and helps to contain her. It's such a crack up to see them together. So, like I said before, I know that every mom thinks her kids are the best and are really super, so why not make them a cape for them to show off to the rest of the world how super they really are? :)
Elijah always comes up to me and asks me to tie his blanket around his neck so he can have a cape and pretends to be a super hero, so I have been wanting to make him a cape for awhile now, I just haven't gotten around to it. Luckily though, my sister-in-law threw her son a really cute and fun superhero/Batman party and the kids were invited to dress up too. We just moved so I don't have access to my sewing machine right now but I wanted to make the kids' costumes. Since capes are easy to make and pretty much just a bunch of straight lines, I bought heat and bond hem tape and it worked like a charm. I hand sewed on their logos to the back of their capes and onto a shirt for Elijah. Elijah LOVES his new cape and mask. He has so much fun dressing up in his costume and loves being a superhero. He's such my super little guy!


 for the capes:
http://floatingworld.typepad.com/superhero.pdf
http://pukingpastilles.com/?p=57 (this one is reversible)
http://thegoodlifebyerin.blogspot.com/2011/01/superhero-capes.html
for the mask:
http://uklassinus.blogspot.com/2008/12/2-down-1-to-go-and-superhero-mask.html
Elijah always comes up to me and asks me to tie his blanket around his neck so he can have a cape and pretends to be a super hero, so I have been wanting to make him a cape for awhile now, I just haven't gotten around to it. Luckily though, my sister-in-law threw her son a really cute and fun superhero/Batman party and the kids were invited to dress up too. We just moved so I don't have access to my sewing machine right now but I wanted to make the kids' costumes. Since capes are easy to make and pretty much just a bunch of straight lines, I bought heat and bond hem tape and it worked like a charm. I hand sewed on their logos to the back of their capes and onto a shirt for Elijah. Elijah LOVES his new cape and mask. He has so much fun dressing up in his costume and loves being a superhero. He's such my super little guy!


http://floatingworld.typepad.com/superhero.pdf
http://pukingpastilles.com/?p=57 (this one is reversible)
http://thegoodlifebyerin.blogspot.com/2011/01/superhero-capes.html
for the mask:
http://uklassinus.blogspot.com/2008/12/2-down-1-to-go-and-superhero-mask.html
Monday, June 20, 2011
Bento Box Lunches
So this isn't something I'm actually doing right now, but I started getting into this and wanted to share. I went to the Japanese food store the other day and I bought a cute bento box for Elijah so that I could start packing him lunches. I remember when I was five and went to school in Japan and my grandparent's housekeeper would pack me and my younger brother bento box lunches for us everyday. I loved them when I was young. Nowadays, you can turn them into a piece of art (which I love). I already cut his sandwiches into fun shapes using cookie cutters that I have lying around the house, but I thought that this would be something fun for him and when he does start school, something nice that would add to his day and let him know I love him and was thinking about him. Plus, I think this would help me actually want to pack lunches for him everyday (something I need to be better at).
So here are a few of the supplies I bought at the Japanese food store.


"Cute Yummy Time: 70 Recipes for the Cutest Food You'll Ever Eat"

"Yum-Yum Bento Box"

"Funky Lunch: Happy Food for Happy Children"

I also found these blogs that are solely for bento boxes.
yum yum bento
cloud 9 food
just bento
lunch in a box
my bentolicious
bento for beginners
adventures in bentomaking
Anyways, I thought I would share in case anyone else wanted to have fun with lunches :)
So here are a few of the supplies I bought at the Japanese food store.

Here's some pictures to give a visual of the ridiculously cuteness and creativity of some bento boxes. (I didn't do these but hopefully I'll give an update of my own if I can learn how to do things like this)


I also went online and purchased a few books that give recipes and tutorials of how to make the character bento boxes (kyaraben). And you don't have to do just Japanese food you can do all sorts of different types of food.
"Yum-Yum Bento Box"
yum yum bento
cloud 9 food
just bento
lunch in a box
my bentolicious
bento for beginners
adventures in bentomaking
Anyways, I thought I would share in case anyone else wanted to have fun with lunches :)
Saturday, June 4, 2011
Toddler Flapper Ruffle Dress
Since I threw my husband his 1920's party, I've been a little obsessed with flapper dresses and with feathers. I had the left over fabric from the photo booth from his party, so I thought it'd only be appropriate to turn it into a flapper inspired dress for Chloe. I just made it up as I went, but later I found a tutorial how to make the bottom of the skirt if you want it.
 I took an extra black shirt that no one was using and cut out the pattern for the dress. (The fabric was jersey, and I didn't take into consideration that it stretches, so if you use jersey fabric maybe trace it a little smaller than you normally would) My pattern was pretty much a rectangle of the width and length that I wanted the dress, then I cut out holes for the head and arms. I stitched them together and had the base of my dress.
For this next part you can look at this tutorial for better instructions and pictures. I took the black and white fabric and cut it into strips 6" wide and then sewed them together, so I would have 3" wide strips. I pulled the threads to gather the strips to get the ruffle look. I then sewed the ruffles onto the base of the dress.
After sewing the ruffles onto the dress, I cut another thin strip of white fabric (about 2" wide) the width of the dress. I sewed the fabric over the first ruffle to hide the raw edges. I thought that the dress still needed a little bit more, so I decided to sew on a few fabric flowers to the front of the dress. You can look at this previous tutorial to see how to make the ruffled flowers and you can use this tutorial to make the big fabric flower on top. (A way to make the fabric flower easier and faster is to hot glue the petals on instead of sewing each one)
 Here's a better close up of the big flower
 To complete the look, I made a feather headband to go with the dress. I just bought a bag of white feathers and hot glued them together and stuck them on a clip that I had wrapped with white ribbon. I then glued on an antique looking broach to cover the ends of the feathers. I personally like to make clips for headbands, that way I can just interchange them to match different outfits, but feel free to glue the feathers directly onto the headband instead of a clip. But Chloe LOVES this headband, mainly because the feathers are so soft.

Here's the look put together


For this next part you can look at this tutorial for better instructions and pictures. I took the black and white fabric and cut it into strips 6" wide and then sewed them together, so I would have 3" wide strips. I pulled the threads to gather the strips to get the ruffle look. I then sewed the ruffles onto the base of the dress.
After sewing the ruffles onto the dress, I cut another thin strip of white fabric (about 2" wide) the width of the dress. I sewed the fabric over the first ruffle to hide the raw edges. I thought that the dress still needed a little bit more, so I decided to sew on a few fabric flowers to the front of the dress. You can look at this previous tutorial to see how to make the ruffled flowers and you can use this tutorial to make the big fabric flower on top. (A way to make the fabric flower easier and faster is to hot glue the petals on instead of sewing each one)


Here's the look put together

Sunday, May 15, 2011
A Ruffled Draped Dress
Sorry, this one isn't going to have a tutorial to go with it. I made this one up by myself. Everything that I did to make this dress was a first time for me. It was an almost epic fail of a dress, and sadly I still think that it might be a one time wear dress for Chloe. I also would recommend that if you try to make this dress, don't use the fabric I used for the ruffles. It frays way too much! I think there's some spray on stuff that's like Fray Check so your fabric doesn't fray, and I would definitely recommend it for this dress.
Like I mentioned before, I don't have a tutorial how to make this dress, but I'm still showing the dress here, so I can try to explain the technique of the ruffles, because I couldn't find it anywhere on the web. With that said, if anyone does find a tutorial for this, I'd love to have it.
The dress I made like every other dress, except I made a casing for the top and sewed the bottom to it. I wanted to have the sheer fabric on the entire dress and I also wanted to throw in some flowers in the top. You can check out some of the other dress tutorials if you need instructions on how to put the dress together.
For the ruffles, I cut out a 6" circle and cut a smaller 3" circle inside the big one.
 Then I cut the circle , so I can lay it out straight. Then I sewed the ruffles onto the base of the dress.
 Here's the final product:
 On her, it looks like a cross of a fairy and Barbie dress, not my intention, but it works :)

Like I mentioned before, I don't have a tutorial how to make this dress, but I'm still showing the dress here, so I can try to explain the technique of the ruffles, because I couldn't find it anywhere on the web. With that said, if anyone does find a tutorial for this, I'd love to have it.
The dress I made like every other dress, except I made a casing for the top and sewed the bottom to it. I wanted to have the sheer fabric on the entire dress and I also wanted to throw in some flowers in the top. You can check out some of the other dress tutorials if you need instructions on how to put the dress together.
For the ruffles, I cut out a 6" circle and cut a smaller 3" circle inside the big one.


Rose Petal Skirt
When I saw this skirt, I immediately needed to make it. It's actually called a "Bustle Skirt", but since I made mine red, it looked like rose petals. I really wish I had seen this tutorial earlier this year, because this is what I would have made for Chloe to wear on Valentine's Day. I love how girlie and romantic it is. I made it a little bit bigger, so she would have it longer to wear ... maybe even for next Valentine's Day : )

This is really easy to make, but it is time consuming. I also decided to make my circles smaller than the ones in the tutorial since I was making the skirt for my 15 month old daughter, and theirs was for a 4 year old. I would recommend just doing the larger circle, it really took a lot more time to cutout and sew all of the circles. But this skirt only took me a few hours to do.
But I LOVE this skirt! I love to watch her run in it, because it just has so much movement from the "petals" all over the skirt. Here's a picture of the skirt worn by my little model :)

Monday, May 9, 2011
A Ruffled Pillow Case Play Dress
Sorry if you guys are getting sick of all the ruffle dresses lately, but I said earlier that I've been obsessed with them lately. I found this tutorial for this dress. It originally was made out of a pillow case. I love that! Here's my version of the pillow case ruffle dress.


And just because here's a close up of the flower :)

Monday, April 25, 2011
A ruffled dress and bow tie
Lately, I have been checking out a lot of different sites for toddler dresses. With Easter coming up, and my husband not wanting me to buy outfits for the kids, I decided I would try my best to make them. Right now I'm obsessed with all of the ridiculously cute ruffled dresses that are everywhere, so of course that's what I chose to make for Chloe's dress. This is my first time making a dress too, so I wanted something that looked easy enough for a beginner. I don't know if that was this dress, but it made all of the other dresses I made after seem really easy. (Those tutorials will be shown in a different post). But I discovered that toddler dresses are so easy and cost effective!


I followed these directions of how to piece the dress together, but I made mine differently since I used left over fabric that I had lying around the house. If you want to do what I did, just take the fabric and fold it in half. Take a dress that is about the size you want to make yours and cut around it keeping a 1/4 in around to sew it together. Or cut a rectangle of the size you want your dress and cut out arm holes and a neck line, then sew them together. (In a later post I'll have a tutorial that will show how to do this for a better visual)
Of course I also had to make a headband to go with her dress. As I was looking for tutorials, I stumbled across this website and instantly fell in love Snazzie Drawers. The best thing about it is that she sells her patterns! And if you don't want to make your own, she has her own etsy store. I used her headbands as my inspiration (I just copied hers). (To make the flowers for both the dress and headband, you can use this tutorial.)
For my son, I really wanted to make him a suit, but alas, I ran out of time (hopefully, that will be a later post). I did, however, make him a bow tie. I wanted it to match Chloe's dress a little, so used the same blue fabric as her flowers. Also, to make this A LOT easier, I used a white elastic for the band, so he can put it on or take it off himself. He loves his bow tie, but didn't let me take a picture of him wearing it.

Subscribe to:
Posts (Atom)